Tuesday, January 31, 2012

Flamingo London NX7: First Impressions!

A new bike! Why did I get a new bike? It is to serve a different purpose, for different riding styles. Although the Dahon Boardwalk X20-R is a folding bike, it is not that convenient to fold and does not fold very compactly. When required, the Boardwalk can be folded in half to "trolley" onto the MRT, or folded further to put in the backseat of a car. However, the folded Boardwalk is too wide to go onto the bus easily, and sometimes I don't want to fold it because I am carrying lots of stuff with the bike.

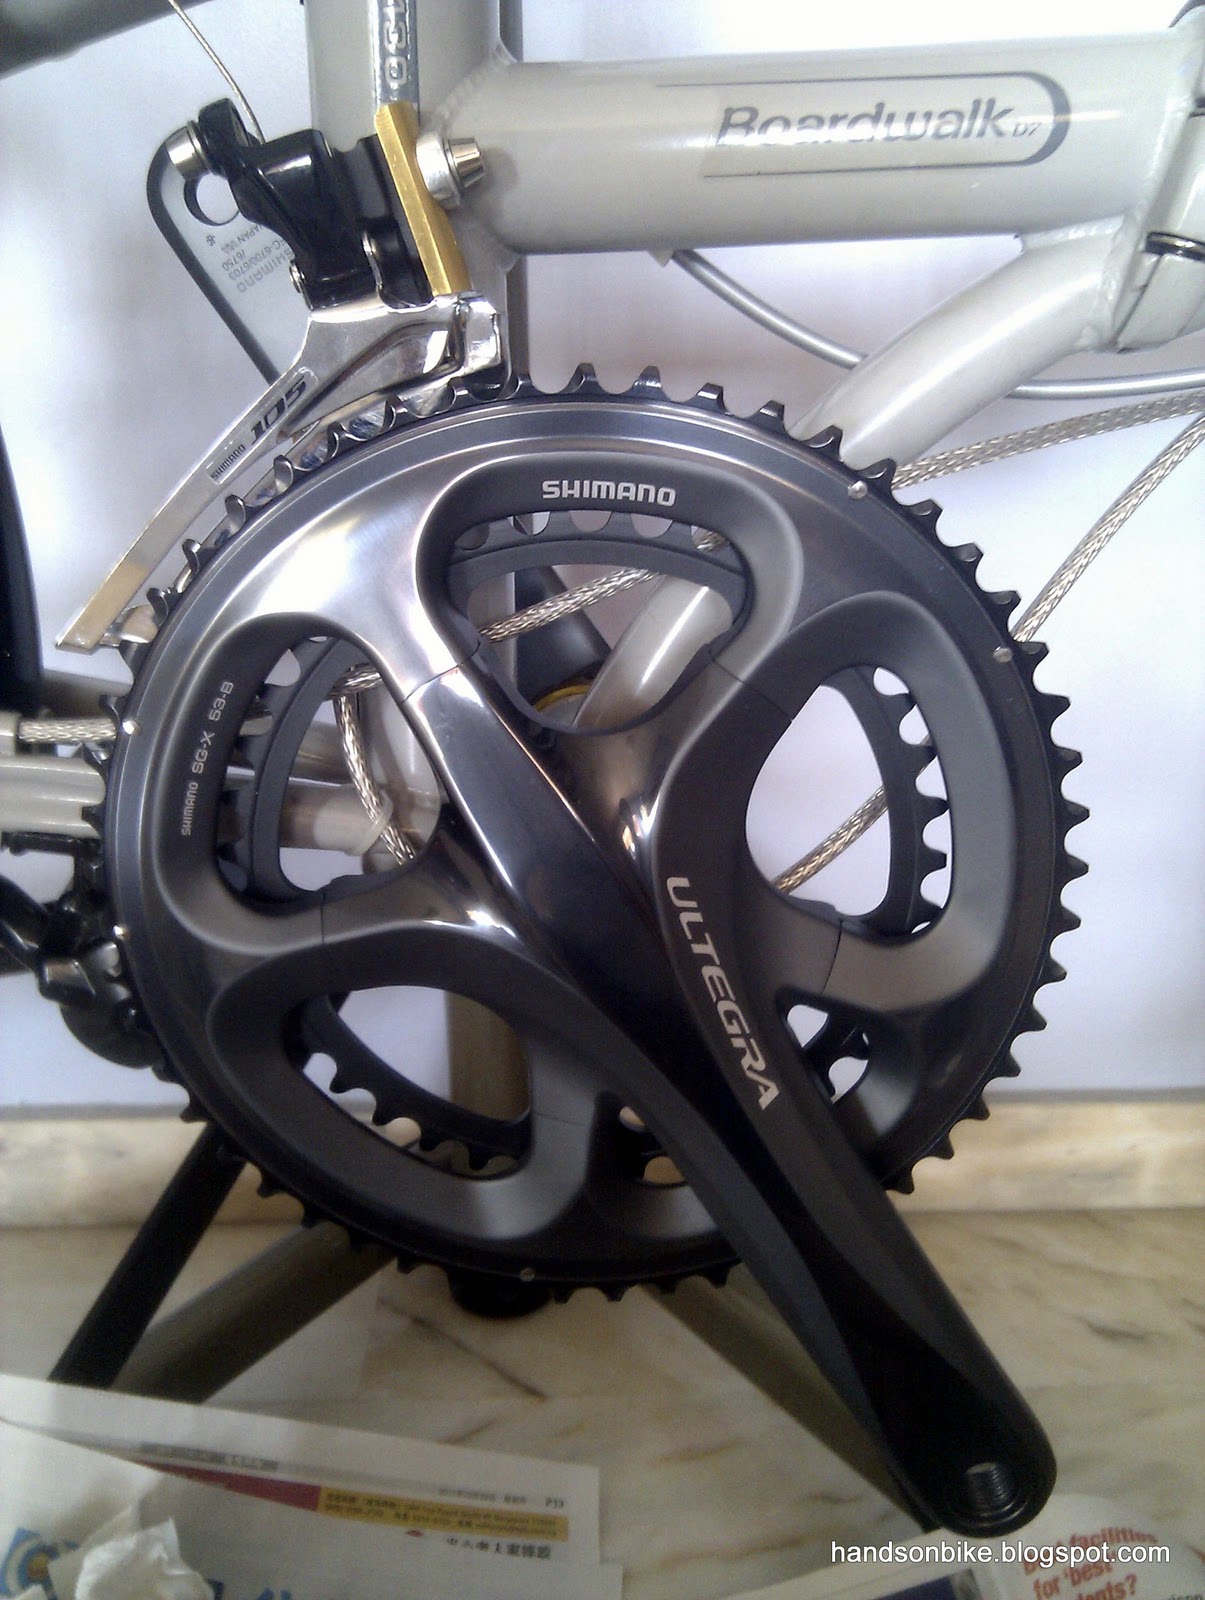
The Boardwalk is now a fast bike, meant to go fast with the drop bars and road bike components. Will be putting up a list of components for the Boardwalk X20-R soon. It can also be a touring bike, meant to go further distances, with its double chainrings for hills and rack+panniers for loads. It is a very versatile bike, its only disadvantage is that it does not fold compactly.

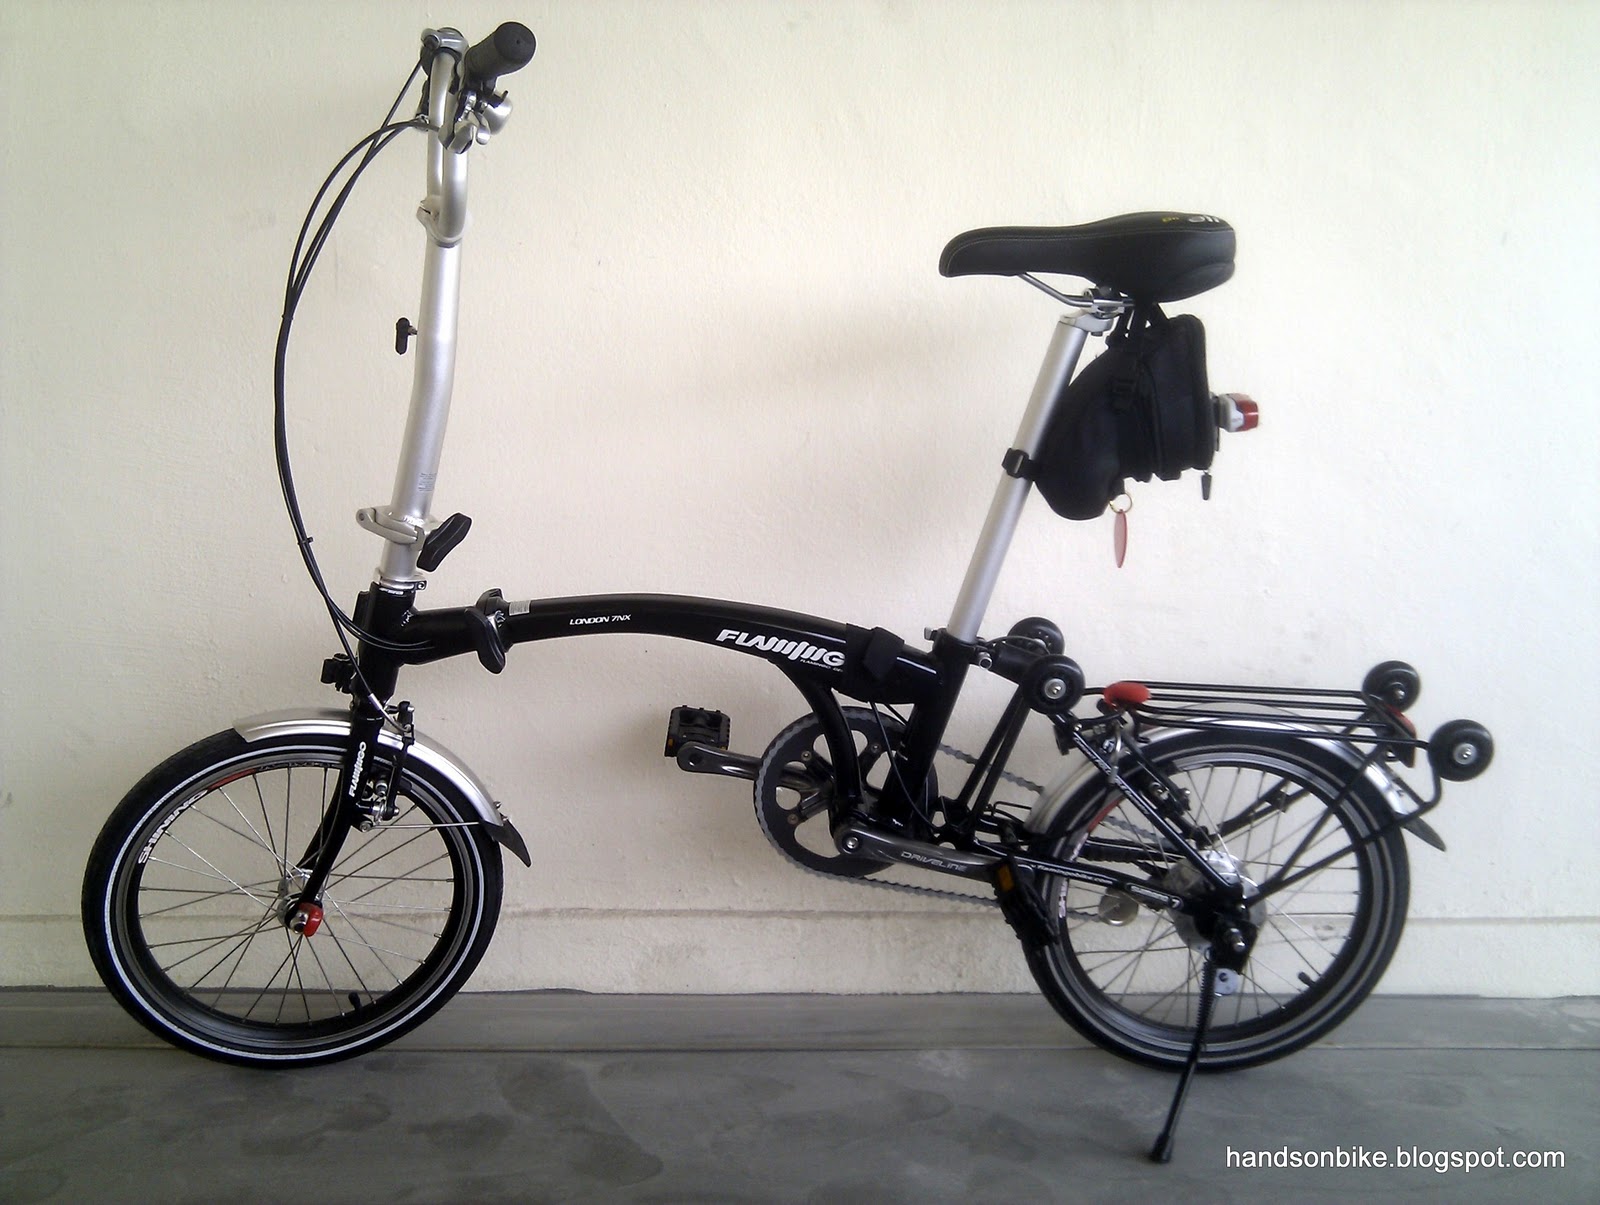
And this is where the Flamingo London NX7 comes in! It has practically the same fold as the Brompton, which has the most compact fold of any 16 inch (349) wheel bike. Another important feature is that it has a rack with rollers that enables you to roll the bike around when folded, excusing you from unnecessary gym sessions with your arms.

High handlebars for a super relaxed ride

Shimano Revoshifter for 7 speed hubs, paired with no brand brake levers.

Closeup view of the 7 speed Revoshifter!

Knob on handlepost that clips into the latch on the front fork, keeping the handlepost secure when folded.

Front fork, with rear mounted mini V-brakes and the latch for locking the handlepost. The Brompton uses caliper brakes instead.

Decent Driveline square taper crankset with folding pedals. 48T chainring..

Rear triangle with rear rack, including 4 rollers. Chain tensioner also seen.

Promax Mini V-brakes (85mm) on the front fork. Might be changing to a normal V-brake (~100mm).

 Closeup of the rear of the bike. Rubber wrapped around the chainstay to prevent scratches when the front fork hooks onto the chainstay during folding. High capacity chain tensioner to take up the slack in the chain when folded.

Normal V-brakes on the rear. (100mm tall). I added a small red blinker for night rides.

Top view of rear rack. Problem with this bike is that the 4 rollers are not aligned properly such that they are parallel. This causes wobbling and auto steering to one side when rolling the bike around.

Red hook will hook onto the rear chainstay when folded.

Big knobs for locking the handlepost and frame. A nice touch for the 2012 Flamingo London NX7 is the integrated FSA headset.

Curved aluminium frame. Comes in a stealthy black colour, low profile. Internal cable routing!

 Convoluted and messy cabling, supposedly required to prevent tangling when folding and unfolding. Noticed that some parts of the cable seem too stretched. Will investigate further when I have the time.

Simple metal clip to hold the rear triangle when carrying the bike up. The Brompton's latch system is much more convenient. Rubber block suspension.

Shimano Nexus-7 internal hub, SG-7R46 (previous model). Works pretty well when shifting gears. Additional drag is noticeable.

One bonus that this bike has is a kickstand! No need to fold down rear triangle to let the bike stand. Obtrusive but convenient.

Dr. Air saddle, very comfortable! It is like sitting on a sofa. Perfect for this bike's usage.

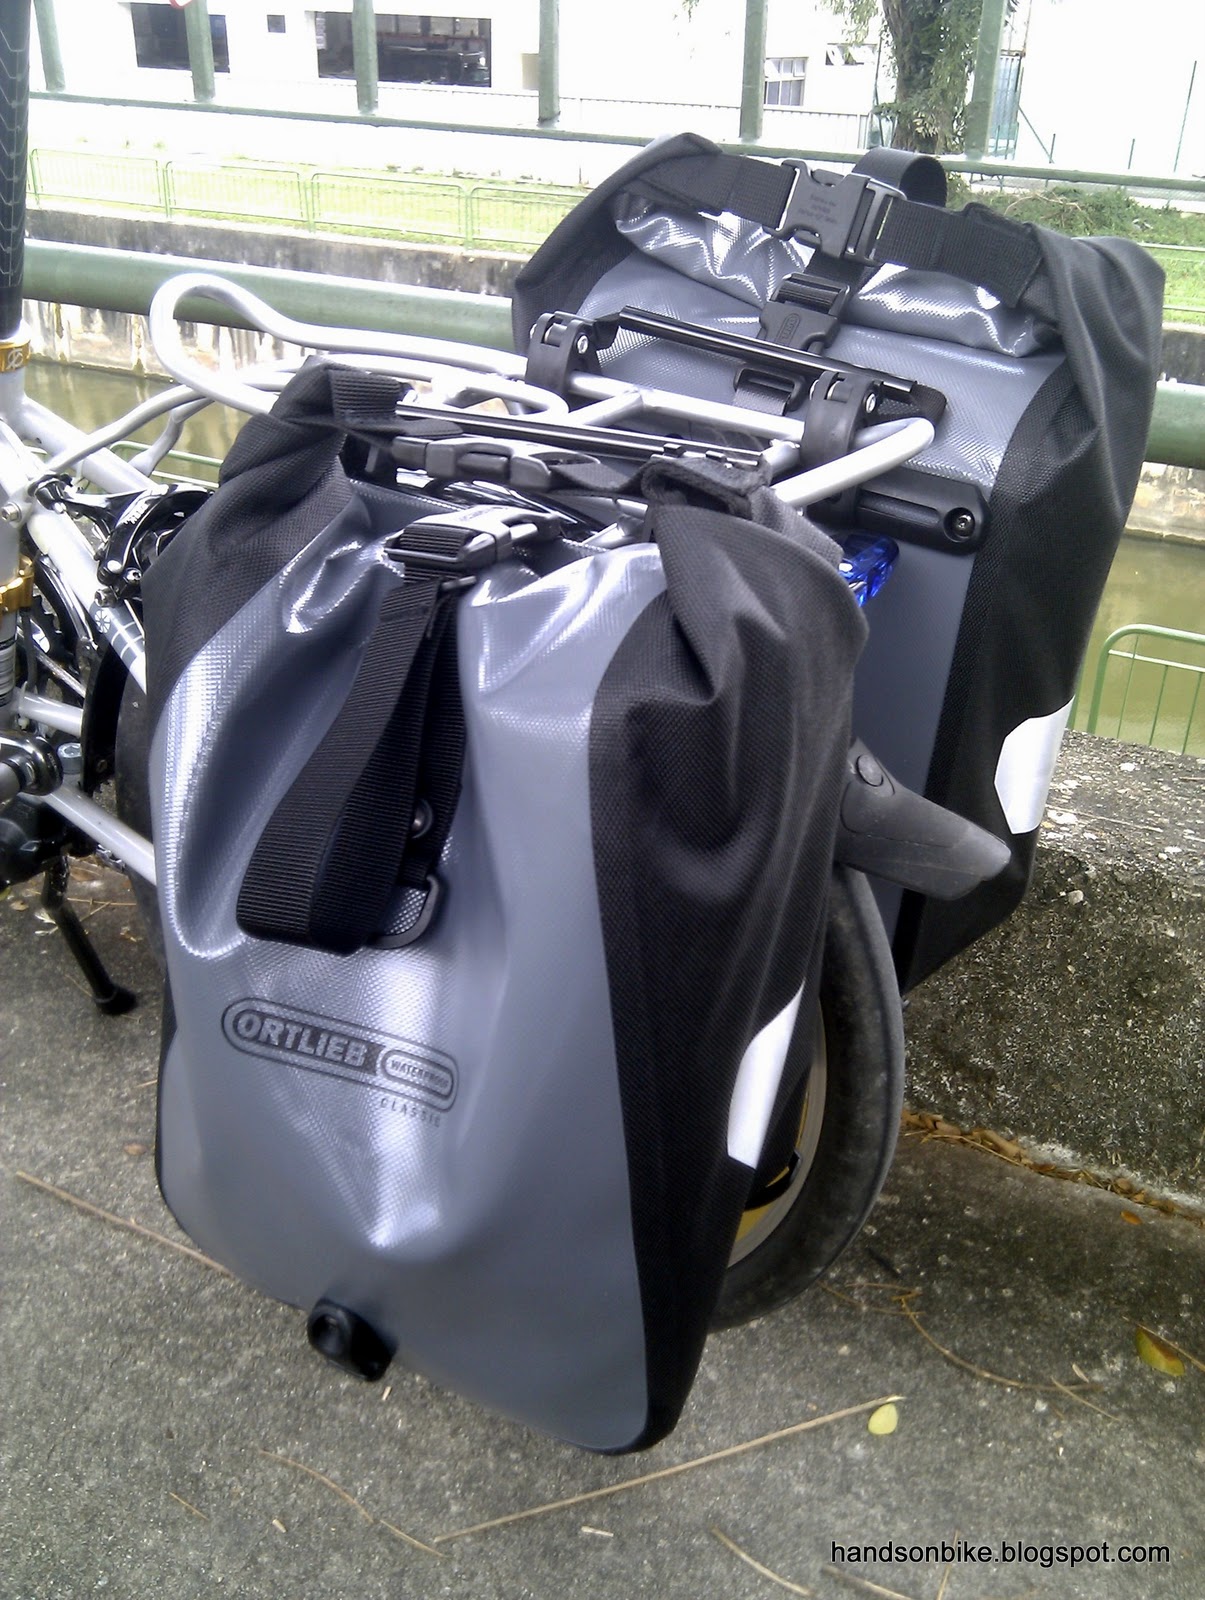
Attached my saddle bag from the Dahon on this Flamingo. It will be a common saddle bag that I transfer between the two bikes depending on which one I am riding.

Misaligned rear rack rollers

The major problem here is with the rear rack rollers. See how misaligned the rollers are! The ones on the rack can be re-aligned by bending the tabs, but the ones on the frame itself (under the seatpost) cannot as the attachment points are far too thick to bend.

Because of this, the bike does not roll straight when I push the bike when folded. Quite irritating as I will have to use a significant amount of strength to prevent the bike from wobbling all over the place. Still thinking of a solution for this.

Other than the rear rack roller issue, the bike works great! The internal gear system together with the Revoshifter means that I can shift gears anytime I want, and jump to multiple gears easily! The gear range is pretty good, will be calculating the actual gear inches for the 7 gears. The tradeoff here is the weight, as the bike weights 13kg with the internal hub! Luckily I can roll it around.

2 more articles coming up for this Flamingo London NX7 will be regarding mixed mode commuting with this bike, and a simple size comparison with a Brompton!

Thursday, January 26, 2012

Journey of the Boardwalk: Part 20 - Shimano Ultegra Crankset

An unexpected upgrade! Was actually looking for a Shimano 105 crankset to upgrade the Vitesse. However, for some strange reason, I couldn't find the right crankset anywhere! I was actually looking for the Shimano 105 5700 series cranks, black or silver, 170mm length, 53/39T. However, it was out of stock online at CRC and also at the bike shops! Doesn't really make sense to pay more to ship from other online bike stores.

Then, Kelvin from Gee Hin Chan offered me a price for the Ultegra 6700 crankset that I simply couldn't refuse. In fact, the price is very competitve compared to CRC! And the Glossy Grey colour looks so fabulous. Although I know I don't really need an Ultegra crankset, but then the poison is too strong to resist! Argghhhh....

Distinctive lines of the Ultegra crankset!

Left side crank

170mm for me!

 The polished finishing is superb.

It looks so good! I love the Glossy Grey colour scheme

53/39T combination

Nice flowy lines...well done product designers!

The reverse side of the Hollowtech II crankset

Closeup on the 39T chainring and the hollow outer chainring

Well positioned sub spikes and main spikes on the rear side of the hollow outer chainring. The rough surface really helps when upshifting from 39T to 53T.

Chainring bolts are screwed in from the rear side! And Torx bolts are used instead of the regular hexagonal head bolts.

Right side crank and chainrings separated!

Raised crank arm spider increases stiffness, they are hollow at the rear so weight is not increased

Cross-sectional view of hollow outer chainring! It is made of 2 layers bonded together, makes it very strong but lightweight since it is hollow inside.

Removing the current Shimano 105 5600 crankset. See how the cable for the FD is routed!

Different left crank cap for Shimano 105 5600 and Shimano Ultegra 6700. The new ones has a bigger thread diameter, which is shown on the right.

Ta-da! Ultegra crankset installed. Very easy as it the bike already has a Hollowtech II BB. Just pull out the old one and insert the new one!

No more gold chainring bolts, but it still looks nice!

 Closeup view of the Ultegra crankset and the 105 FD

 
 View of left crank

View of the full bike!

The Dahon Boardwalk X20-R on the Boardwalk

Not only does the crankset look good, the shifting performance also feels much better! Previously, when I upshift, sometimes the chain does not shift properly, either it shifts very slowly or it does not shift at all. Not very ideal, but I didn't complain because I hardly need to shift, unless I encounter steep slopes that require me to downshift to the 39T chainring.

Now, the shifting is practically instantaneous! It is much better than what I expected. Push the lever and it climbs up effortlessly and almost instantly. Front shifting has never felt better! This also dispels my belief that the LitePro FD adaptor that I am using is too flexible to give good shifting.

I think there are 3 main reasons why the shifting is so much better now:

1) Better FD alignment. I realised that the FD alignment was not perfect, which may have contributed to poor shifting performance. This time, when I installed the Ultegra crankset, I took extra care and time to position the FD properly.

2) Extra large ramps and spikes on the rear side of the hollow outer chainring. Also, the rough surface at the back of the chainring. Together, they catch the chain very well during upshifting and makes the chain go onto the 53T chainring easily and accurately.

3) Excellent compatibility between the Ultegra 6700 crankset and the Dura-Ace 7901 chain. The 7901 chain has a special profile on the inner and outer plates that interact with the chainrings and cassette sprockets to ensure good shifting. By upgrading to the Ultegra 6700 crankset, it fully maximises the chain's profile and consequently provides excellent shifting.

Needless to say, I am very happy with the new Ultegra crankset! Not only is the price reasonable, the appearance is excellent, it has also improved the front shifting tremendously! If you are interested in the weight, you can check it out over at the Weight Weenies blog post.

PZ Racing Freehub Maintenance!

Was taking apart the Vitesse, so decided to service the freehub of the rear wheel at the same time!

The freehub is one of the components on the bike whereby almost no maintenance is done at all. This is because it hardly gives any problems, and usually lasts very long, unless you are a hardcore cyclists who rides hard for long distances, clocking up lots of mileage!

After a series of freehub failures experienced by Matt and KC, it has highlighted the fact that freehubs do fail, although it is quite rare! In both the cases, I believed the springs holding the pawls in the freehub broke, causing the hub to freewheel in both directions.

Note that freehub maintenance is not a routine maintenance at all, and one should not attempt it unless you know how to put it back! Usually hubs with sealed bearings are easier to take apart and re-assemble, as compared to cup-and-cone bearing hubs.

The inside of the freehub! Note the ratchets that will engage with the pawls on the freehub body. This is the degreased condition.

The other parts of the rear hub. The freehub body and the covers/axle support on both sides of the axle. I'm lucky that this hub (PZ Racing) is maintenance-friendly.

The 3 pawls on the freehub body, degreased. Not with degreaser, but just wipe off the old dirty grease.

Special grease for the freehub! More viscous than oil, but not as thick as normal grease. This is something like a light grease.

Grease generously! Make sure to get grease under the pawls on the freehub body.

After greasing, the freehub runs much smoother, but it is also less noisy as the grease somewhat cushions the snapping of the pawls onto the ratchet. As the hub runs, the grease will move around and the hub should get louder over time.

By greasing the internals of the freehub with fresh grease, it helps to ensure that the wear and tear is kept to a minimum, and this will help to extend the life of the freehub.

Saturday, January 14, 2012

Ortlieb Front Roller Classic Panniers Review

I have always wanted to carry more things on my bike! By having greater load capacity, this allows me to ride further and longer, as I can bring along supplies. It is also great for commuting, as you will not have to worry about whether the bike can contain your work clothes, work shoes, showering stuff and other barang-barang. Personally, I don't like to carry a bag when I cycle, as it makes me sweat more, and can even cause backaches if you carry too much on your back while cycling. As Mr Brown once said, "Why lug it on your sweaty back when you have this metal thing with wheels to lug it for you?" Read about his excellent guide to bicycle commuting here!

Even before I added the rear rack, I already have the Biologic Tour Bag, which mounts on the front of the bike. It is a rainproof bag, which has a waterproof layer and has an overlapping cover that prevents rain from entering the bag. Not waterproof, as water can still enter if the water comes from the bottom (highly unlikely, unless you submerge the bike!) The capacity of the Biologic Tour Bag is about 7 litres.

Biologic Tour Bag

The Biologic Arclite Rack which I had bought previously has already proven itself to be very useful. Read about the rack here. However, in order to maximise the capacity of the rack, the best way is to add bags to it! I had thought about just getting a rack top bag, so that I can place things on top of the rack. Only when I started searching for rack top bags did I find that it is hard to actually get a good waterproof rack top bag.

Biologic Arclite Rack

In any case, a rack top bag such as those from Topeak does not have a large capacity. Although they have rain covers, it is very troublesome to have to stop and put on the rain cover when it starts raining. If you always put a rain cover on as a preventive measure, it is also troublesome when you want to get items from the bag. I would much prefer a rainproof bag where a separate rain cover is not needed.

Of course, no other company makes waterproof outdoor gear like Ortlieb! Ortlieb is a highly respected manufacturer of waterproof outdoor gear, and they also make panniers for bikes. By the way, panniers mean basket in French!

I was initially hesitant to get panniers, as I was afraid that it may cause heel strike when I put it on my bike. However, I know that many folding bike riders actually use Ortlieb panniers with no problems. The trick is to get the smaller Front Panniers, instead of the larger Rear Panniers. Together with the highly adjustable clips on the panniers, the bags should clear the heels when pedaling.

Shall let the pictures do the talking!

New Panniers! Arrived via Air Mail, cardboard box is a little dented, but no problem!

Grey and black colour scheme matches my bike! 790 grams each including shoulder strap.

Adjustable hook will hook onto your rack, preventing it from swinging outwards. The large black piece of plastic prevents sharp parts of your bike, such as the QR from wearing out the fabric.

Conveniently hooks onto the flat portion on the rack, which is originally used to hook the ends of the elastic cord that comes with the rack.

Simple but secure clip system for fixing the pannier onto the rack. Can adjust forward or backward to prevent heel strike!

See how I adjusted the clips so that the bag is all the way at the rear. Also, I clipped the panniers as far back on the rack as possible. No heel strike!

Roll top closure is virtually waterproof! Doubles as a carrying strap

Can also use this strap to close the top, if the clips at the two ends are used to connect the shoulder strap

Connect your shoulder strap to the end of the clip!

Spacious interior. 25 liters total capacity for the pair of panniers. In practical terms, I can fit a 1.5L bottle plus a pair of running shoes into one pannier with space to spare!

Bringing the panniers out for a field test! A full first aid kit on one side, a bike tool kit with lots of spare tubes and a 1.5L bottle on the other side.

Wide vehicle passing through! Actually it is not much wider than the handlebars, but you got to be careful when squeezing through narrow gaps.

Fits pretty well with the overall colour scheme of my bike. With the additional weight, and because the pannier is located all the way at the rear, the bike now tilts to the rear instead of the front when I put down my Pletscher kickstand.
I love these new panniers! On Friday, I lugged these things back from work:


1 set of uniform
1 set of T-shirt and jeans
1 pair of cycling shoes
1 set of showering stuff, including towel
and lots of smaller items such as umbrella, water bottle etc.

There is still some space left, can probably put in another 2 sets of clothes! Note that I did not even have to use my Biologic Tour Bag. I no longer have to plan in detail what to bring on the bike when I commute to work, just put in whatever you need!

With the panniers on and fully loaded, riding the bike seems a bit more difficult, as it feels heavier and steering is a bit laggy. When getting off the bike, got to be careful not to let the bike tilt to one side! Best is if the panniers are balanced on both sides. When riding into a headwind you will feel more drag as there are 2 big bags hanging off the side catching the wind!

In any case, I can easily transform from a speedy bike to a touring bike, just by removing or adding the panniers. In fact, it is so useful and the capacity so ample that I might consider retiring the Biologic Tour Bag up front...