Sunday, January 31, 2016

Wheelsport Fantasy 2x10 Speed: Part 7 - Solving Chain Interference at FD + Extra Bottle Cage

Part 1: Original Bike Components
Part 2: Bike Disassembly and Component Weight
Part 3: Installation of New Components
Part 4: Final Assembly and Comparison

Part 5: Flat Bar to Drop Bar Conversion
Part 6: Geometry Comparison

While upgrading my friend's Wheelsport Fantasy 2x10 speed drop bar mini velo, I noticed that it had the same front derailleur mounting issue as seen on my own Wheelsport Fantasy bike. The angle of the FD mount on the frame is not suited for this small wheeled bike design. As such, there will be interference between the chain and the FD chain guide when the chain is in the small chainring. Let's take a look at the issue here, find out how it happened, and how it can be solved on this frame.

No issue with chain interference when the chain is in the large chainring

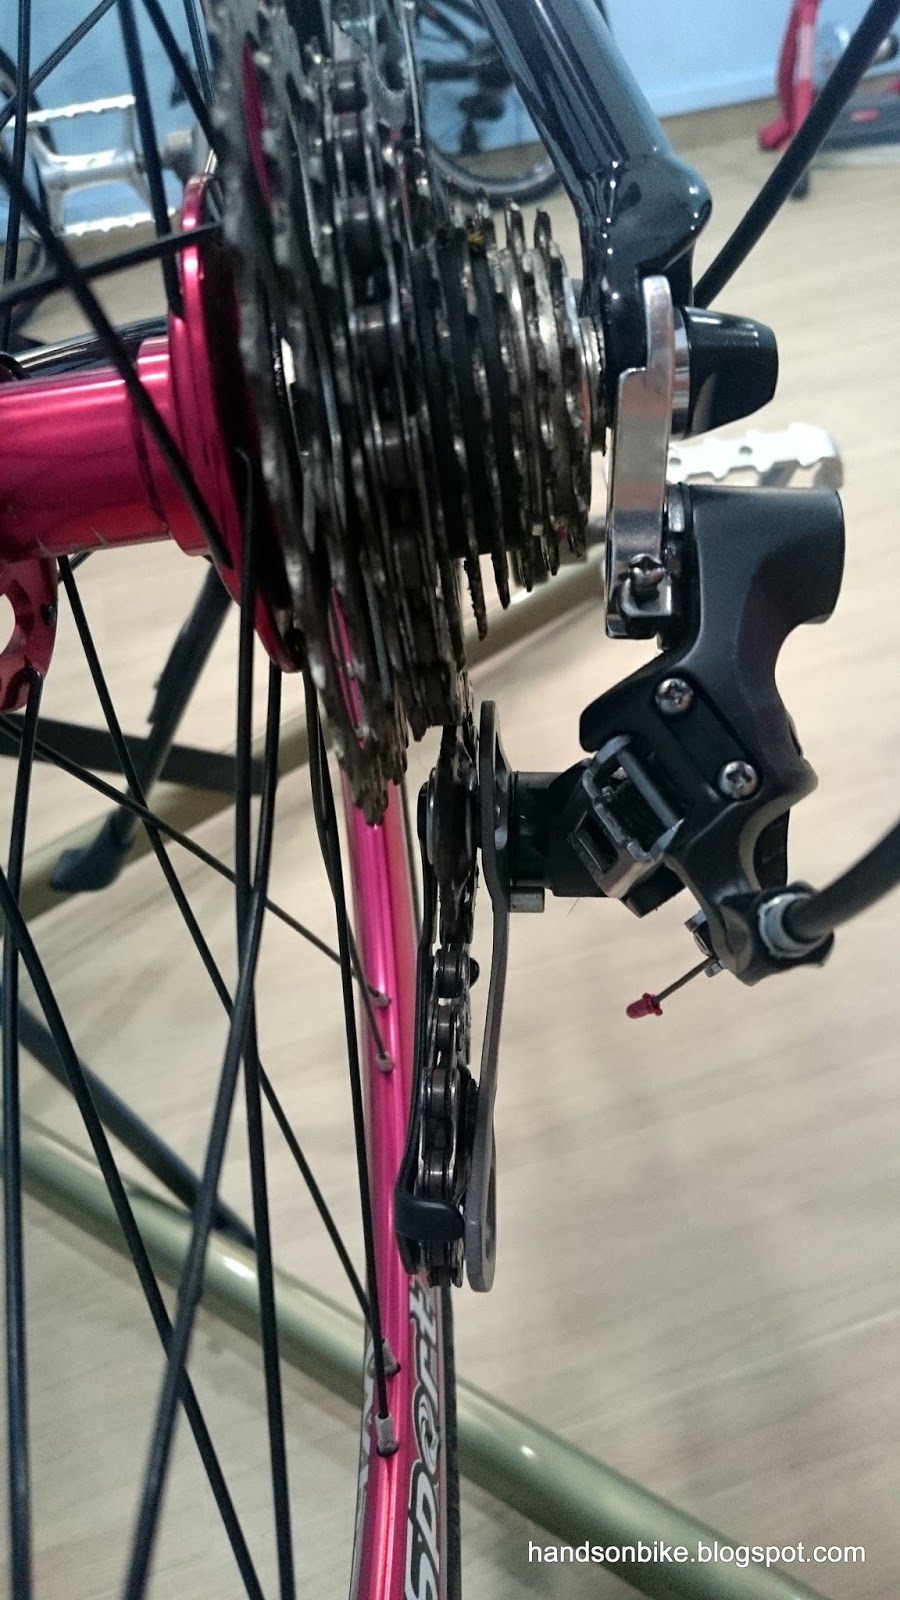
However, when the chain is in the small chainring, the chain will rub against the bottom of the FD chain guide in most gears

Close up view of the chain interference with the bottom of the FD chain guide

Chain barely clears the FD chain guide when in the front low and rear gear 3 setting. At gears 4 or higher, the chain will rub the FD chain guide.

After studying the differences between the mini velo and my Merida road bike, I have found the reason why there would be chain interference. The main difference in frame geometry that causes this issue is the position of the rear axle relative to the bottom bracket. More specifically, whether the rear axle is higher or lower than the bottom bracket.

On almost every adult bike, the bottom bracket is around the same distance from the ground, no matter a small wheeled bike or a full sized road bike. This is to maintain sufficient crank arm clearance from the ground, and yet allow the rider to climb on the bike easily.

However, the rear axle's distance from the ground will differ greatly, depending on the size of the wheel. A road bike with large 700C wheels will have the rear axle higher off the ground as compared to that of a 20" wheel folding bike. This affects the angle of the chain relative to the FD chain guide. If the FD mount is located on the mini velo seat tube with the same orientation as that on a road bike, it will cause FD compatibility issues for small wheeled bikes.


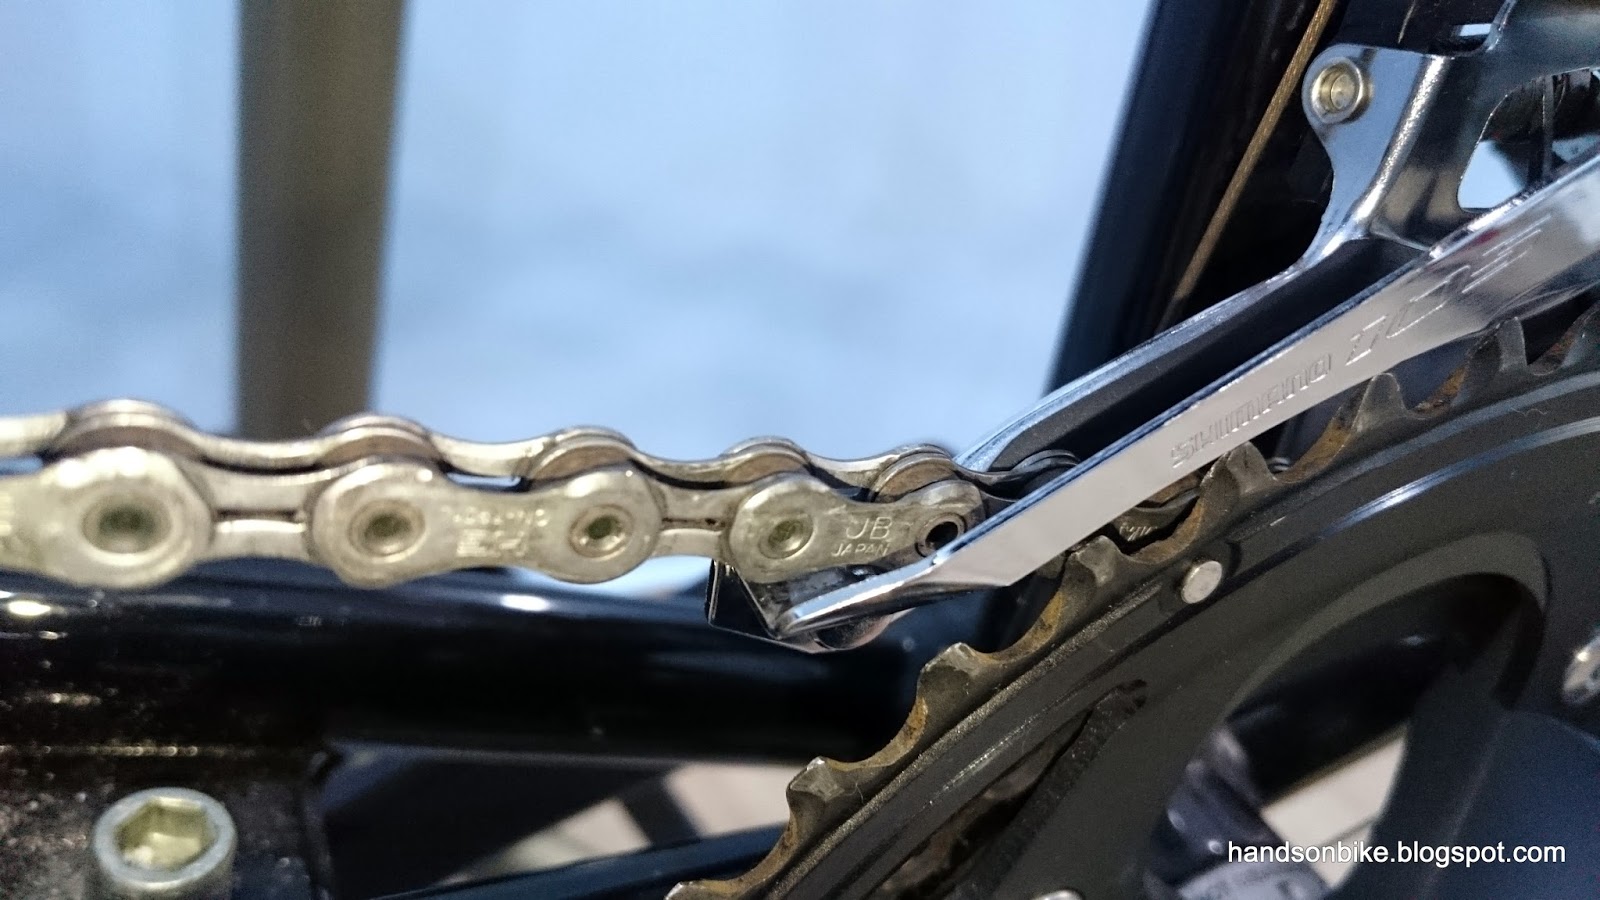
On the road bike, the rear axle is much higher than the bottom bracket. As such, the chain slopes more steeply upwards from the small chainring to the cassette. This ensures that the chain does not touch the FD chain guide even when in the front low/rear top gear combination as shown here.

On small wheeled bikes, the rear axle is lower than the BB. The chain is almost straight when in the front low/rear top gear combination. As such, the chain will touch the FD chain guide if the FD mount is not placed correctly on the frame. In the case of this Wheelsport Fantasy mini velo, the chain will touch the bottom of the FD chain guide in the top 7 gears of the cassette. Only when the cassette gear is set at gear 1, 2 or 3 will there be no interference.

Comparing the angle of the chain between road bike and mini velo. See how different the chain angle is, and the different height of the cassette.

For small wheeled bikes, the proper way to locate the FD mount on the frame is to place it behind the seat tube, and tilted to follow the curvature of the chain ring. However, on the Wheelsport Fantasy frame, the FD mount is parallel to the seat tube, and is located along the seat tube and not behind it. This means the FD will be fixed at the wrong position for proper operation.

On the Wheelsport Fantasy frame, the FD mount is placed parallel to the seat tube and right in the middle of it, which is not the correct position.

The correct way is to place it behind the seat tube, and to tilt it so that the FD chain guide can follow the curvature of the chain ring. Example shown here is from a Tyrell mini velo.

As can be seen from the Tyrell bike shown above, the FD mount is placed behind the seat tube and also tilted. This ensures that the FD is angled correctly relative to the chain and the rear axle position. To solve this issue on the Wheelsport Fantasy mini velo, I will need to move the FD to the correct position. As previously done on my own mini velo, I will use the same spacer and angled shims to move the FD position.

Using the spacer and the angled Ridea 4 degree shims

Together with a long bolt and some spherical washers, the new FD mount is created

New position of the FD with the custom mount. The FD has been moved rearwards and also tilted to follow the curvature of the chain ring.

Now, even when the chain is in the front low and rear top position, there is clearance between the chain and the bottom of the FD chain guide

Inner cable fixed up with the FD in the new position

FD support bolt is unable to push against the frame, but the FD is still rigid enough, and front shifting still works well

With the custom FD mount created, there is no more chain interference with the FD chain guide. In fact, the custom FD mount works much better than the stock bike condition. After giving feedback to the bike shop and the frame maker, I am glad to see that Wheelsport has improved their FD mounting on the mini velo for the model year 2016 frames. The FD mount has been moved rearwards on the seat tube, and it should now work without requiring the custom FD mount.

Another small issue with the Wheelsport Fantasy mini velo frame is that there is only one bottle cage mount. Having just one bottle cage mount is quite standard on most mini velo or folding bikes, so it is not really a problem with frame design. However, it is useful to have an extra water bottle when riding long distance, and so I found a way to add an extra bottle cage to the Wheelsport Fantasy mini velo frame, while keeping it neat and unobtrusive.

It is not possible to add an extra bottle cage mount for a standard water bottle within the frame triangle, as there is not enough space. Adding a small tool bottle is possible though, as already done previously on my own mini velo.

To have an extra bottle cage mount, I decided to use the Monkii Cage water bottle mount, which clamps on a round part of the frame and creates an extra bottle cage mounting point. The round clips are not used. Instead, a standard bottle cage is bolted to the Monkii Cage mount.

Monkii Cage mount. The two round clips are not required for this set up.

The Monkii Cage mount fits perfectly in this little triangle on the frame. Without this design element on the frame, it would not be possible to fit the bottle cage mount here.

A second water bottle fits nicely at this location. Although it is difficult to access the water bottle while riding, it is still acceptable as it is much better than having just one water bottle on the bike.

With that, the latest modification to this Wheelsport Fantasy mini velo is complete. The FD mounting issue has been solved, and a second bottle cage has also been fixed to the frame.

Friday, January 15, 2016

Wheelsport Fantasy 2x10 Speed: Part 6 - Geometry Comparison

Part 1: Original Bike Components
Part 2: Bike Disassembly and Component Weight
Part 3: Installation of New Components
Part 4: Final Assembly and Comparison

Part 5: Flat Bar to Drop Bar Conversion

With the other Wheelsport Fantasy mini velo also converted to a 2x10 speed drop bar set up, it is now the perfect chance to compare it with my own matte black Wheelsport Fantasy mini velo. The wheelbase will of course be the same, since it is the same frame, but other geometries such as the handlebar reach will be different.

2x10 speed Tiagra/105 drivetrain on the bike with red hubs, and 2x11 speed Ultegra Di2 drivetrain on my own matte black frame

Both are using 451 wheelsets, but with different brand of tires

Looks very similar, since it is the same frame design and with similar setup

Pair of Wheelsport Fantasy mini velos!

My matte black mini velo has a longer reach to the handlebar, which gives a more aggressive riding posture

Also, my matte black bike has a shorter handlepost, which also gives a more aggressive riding posture. The stem on the other bike cannot be lowered any further due to limitation of the folding handlepost design.

Close up view of the different handlepost heights and handlebar positions

Even closer view at the reach of the two bikes. My bike with the Ultegra Di2 shifters has a lower and further reach.

Time to finish up the other bike with a good bar tape! I like Lizard Skins bar tape as it is super comfortable, and can be rewrapped many times without getting sticky.

Ta-da! Fresh bar tape on the Wheelsport Fantasy 2x10 speed drop bar mini velo.

Complete view of the Wheelsport Fantasy 2x10 Speed Drop Bar Mini Velo

Close up look at the drivetrain, with Shimano 105 components

Equipped with Tiagra 4700 2x10 speed road shifters, which has the same good shifting ergonomics and feeling of the new generation Dura-Ace/Ultegra/105 shifters.

All ready to roll!

Complete specifications of this upgraded Wheelsport Fantasy 2x10 Speed Drop Bar Mini Velo

With this conversion from flat handlebar to drop bar setup, it is easier to achieve a higher cruising speed as the more aggressive riding posture allows good power transfer to the pedals, and also puts the rider lower down for less air resistance.

We have tried riding our Wheelsport Fantasy mini velos with a group of road bikes at a rolling speed of about 32-35km/h, and this Wheelsport Fantasy mini velo is able to keep up, although it does take more effort compared to a full sized road bike. The setup on these two Wheelsport Fantasy mini velos are as good as it gets if you want to ride fast on a mini velo. Going to more high end components will not improve your speed any further as these components are not the limiting factor.

Friday, January 8, 2016

Wheelsport Fantasy 2x10 Speed: Part 5 - Flat Bar to Drop Bar Conversion

Part 1: Original Bike Components
Part 2: Bike Disassembly and Component Weight
Part 3: Installation of New Components
Part 4: Final Assembly and Comparison


Remember the Wheelsport Fantasy 2x10 Speed flat handlebar mini velo that I built for my friend? It was previously using mostly Shimano 105 5700 components transferred over from my Dahon MuEX. It worked very well and it shifted much better than the stock 1x9 speed drivetrain that came stock with the bike.

However, it was unfortunate that the bike crashed and was damaged. Luckily the rider was OK, but there was some significant damage to a few of the components. At the same time, me and my friend thought that it would be a good idea to convert the Wheelsport Fantasy flat handlebar mini velo to a drop bar set up. This would enable the rider to get down into a more aerodynamic position for more speed.

Therefore, the plan is to repair the damage on the bike, and also convert it from a flat handlebar to a drop bar set up at the same time! First, let's take a look at the damage and see how it can be fixed.

The bike crashed on the right side, which meant that the damage was all on the right side of the bike. Other than the non-critical scratches on the pedal and the end of the handlebar grip, the most critical damage was found at the rear derailleur.

As seen below, there was great impact on the rear derailleur, causing lots of scratches, and most critically, a bent rear derailleur hanger. The rear derailleur itself would probably still work fine despite the scratches, but the bent RD hanger needs to be fixed.

Some deep scratches on the 105 5700 rear derailleur, but probably will not affect the function.

However, the RD hanger was quite badly bent, causing the gear shifting to be all wonky and not fixable. 

The RD hanger is usually designed such that it is soft and will bend during impact, so that the frame itself does not get damaged. A replacement of the RD hanger and maybe the rear derailleur (depending on extent of damage) will be able to fix this issue. As this Wheelsport Fantasy mini velo frame was from MyBikeShop, I went back there to get a replacement RD hanger for this frame. Luckily, they had it in stock and so I could quickly get a replacement.

Replacement RD hanger for the Wheelsport Fantasy mini velo frame!

Comparing the old and new RD hanger side by side, the damage is quite obvious.

With the RD hanger issue fixed, the next step is to gather all the components for converting to a drop bar set up. Normally, converting from a flat handlebar to a drop bar set up is relatively easy. All it takes is a drop bar, a road shifter for the drop bar, and some re-installation of the inner cables.

As the bike already has a 10 speed Shimano 105 5700 RD and a 5700 FD, along with a 10 speed chain and cassette, all it takes is a change of shifters. Compatible 10 speed road shifters would be either Dura-Ace 7900/Ultegra 6700/105 5700 or Tiagra 4600 shifters.

However, these are the previous generation of shifters, which are not as good as the latest generation of shifters (Dura-Ace 9000/Ultegra 6800/105 5800/Tiagra 4700). I would prefer to upgrade to the newest generation of road shifters if possible.

The problem is, the latest Dura-Ace, Ultegra and 105 are all 11 speed groupsets, which requires a totally new drivetrain. Using these 11 speed shifters would require a change of the RD, FD, chain, cassette and maybe the crankset. Also, I am limited by the rear hub on the wheelset, which can only support up to 10 speeds. Going to 11 speeds would require a new wheelset which is a costly investment.

The good news is, the latest Tiagra 4700 road shifters are still 10 speed. The bad news is, the cable pitch for the new Tiagra 4700 series is different from the previous Tiagra 4600 series. In other words, it is still 10 speed, but the RD, FD and shifters operate on a different cable pitch.

What does all these mean? The implication is that the 10 speed cassette, chain and crankset are still perfectly compatible across the old and new 10 speed drivetrains. There is no need to change out these components if I am changing from the current 105 5700 series to the new Tiagra 4700 series.

What I do need is the new Tiagra 4700 road shifters, and the new generation of RD and FD. All other drivetrain components on the bike can remain the same.


First of all, a drop bar is required. This FSA handlebar is either from the Merida Scultura 5000 or the Dahon Boardwalk, I can't remember which bike it came from.

Next, the new Tiagra 4700 2x10 speed road shifters! Construction is based on the latest generation of 11 speed shifters, with lighter shifting and better ergonomics.

Weighs 492 grams per pair, quite decent weight, although it is quite far off the 365 grams of the Dura-Ace 9000 shifters.

The ideal rear derailleur and front derailleur to go with these Tiagra 4700 road shifters would be the Tiagra 4700 RD and FD. However, these are currently (Sep 2015) quite difficult to get hold of as they have just been launched to the market recently, and are only found on OEM bikes for now. As such, I decided to use the 105 5800 RD and FD instead. These are actually 11 speed RD and FD, but I figured that since the construction of these components are similar to the Tiagra 4700 components, they should also work with the Tiagra 4700 shifters, although they may not work perfectly. Besides, the black colour of the 105 5800 RD and FD would better match the black Wheelsport Fantasy frame.

Shimano 105 5800 Double FD, for 11 speed drivetrains. Brazed on type. Similar in design to the higher end Ultegra and Dura-Ace FD.

Weighs 89 grams, which is actually similar in weight to the Ultegra FD.

Shimano 105 5800 11 Speed RD, short cage version. Also similar in construction to Ultegra and Dura-Ace.

Weighs 226 grams, a bit more than the Ultegra RD.

Polymer coated shifter inner cables on the left, normal stainless steel brake cables on the right.

Installing the shifter inner cable on these new shifters require a special nose cap on the shifter to prevent unwanted wear on the inner cable.

Shifters and drop bar installed on the bike. Stem has been lowered slightly for a more sporty riding posture.

After installing the shifters, the next step is to install the new RD and FD. Nothing special here, just remove the old RD and FD and install the new ones. After that, the cabling and the adjustment of the RD and FD can be done.

All inner cables and outer casings installed, including those for the brakes!

FD-5800 installed! Bolted on directly to the FD hanger.

Tucking in the inner cable for the FD through the FD hanger, to prevent the cable from touching the leg during pedaling.

RD-5800 installed! New RD on new RD hanger.

The installation is almost complete! Adjustment of the RD and FD went without any issues, it seems OK to use the 11 speed RD and FD with these 10 speed road shifters. The only thing left is to wrap the bar tape, and to compare it with the other Wheelsport Fantasy Ultegra Di2 mini velo that I have! To be continued in the next part...